


Garages can be messy places, which can make cleaning up intimidating. However, there’s an easy solution to a messy garage: pegboards.
Pegboards may look old‑fashioned, but that’s just proof of their durability and versatility. Let’s take a look at what makes them such a good choice for organizing your garage.
How Pegboards Can Help
If you’ve ever hurt your hands while rooting around in a box or drawer full of tools – those screwdrivers can be sharp! – you’ll immediately see how pegboards can help you out. They offer a safe way to store your tools and keep you from potentially hurting yourself while rummaging around for what you need.
However, pegboards can help you in many other ways, making them ideal for storing your tools.
Why Pegboards are Better Than Other Storage Methods
Pegboards have many advantages over other storage and organization solutions for your garage, including:
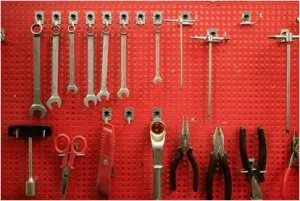
Visibility:
If you store your tools on a pegboard, they’re always within view so you can choose the right one at a glance. No more rooting around in drawers and storage containers!
Customizability:
You can add shelves and metal hangers to a pegboard so it can hold a variety of tools. These additions can be changed whenever you need, meaning that you’re not locked in to a specific organizational method. On top of that, you can paint your boards whatever color you want.
Versatility:
You can do more than just hang tools on pegboards. You can also use them to organize other household items like arts and craft supplies, and even use them in your kitchen to store utensils like spoons and spatulas.
Cost‑effectiveness:
They’re also space‑saving since they take advantage of the storage space your walls provide. This gives you more room for things like workbenches and other, larger forms of equipment.
How to Install a Pegboard in Your Own Garage
Installing a pegboard is easy, but you will need the following tools first:
- Drill
- Stud finder
- Level
- Wooden boards (for the frame) or pegboard spacers
- Tape measure
- Pencil
- Screws and washers
First, you need to measure the wall where you’ll hang your pegboards – choose a spot that’s low enough to reach but high enough to accommodate any counters or workspaces. You’ll need to measure the space with your tape measure, use a level to make sure that the board isn’t slanted, and draw an outline of the spot you’ve chosen with your pencil.
Next, use the stud finder to find where the studs are located on the hanging wall and then affix the wooden boards to the wall. The pegboard will hang off of these wooden boards. You can also use pegboard spacers instead of wooden slats, but this will require superglue and another person to help you.
Finally, you can put up the pegboard itself. If you’re using a frame, now is when you use the screws and washers to attach the pegboard to the frame – the washers are very important as they’ll distribute the weight of the board more evenly.
Once the pegboard is on the wall, you can apply paint or varnish to it. This is a good extra step to take to prevent water damage. Once the paint is dry, then you can add all the hangers and hooks you want.
If you’re looking for even more ideas to keep your garage organized, you might like this post featuring best practices for garage storage!
Add new comment